4.0 Dispensing FuelLink
Click Dispense from the Main Menu to Dispense Fuel.
4.1 Dispense OptionsLink
We have built Fuellox to satisfy a range of customer needs. For this reason it is possible to collect various parameters each time fuel is dispensed. Your organisation will have established a policy to ensure they collect the data they need to administer the Fuellox System.
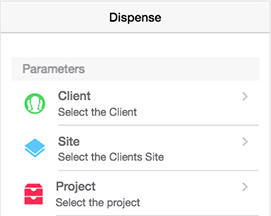
4.2 Dispense ParametersLink
The Following Parameters can be collected with each fuel transaction. Parameters can be REQUIRED or OPTIONAL.
CLIENTYour Customers are reffered to asClientswithin FuelloxSITESEach Client has one or more Sites. A Site is the place they actually do the work.PROJECTSAre not exclusive to a Client or Site, but to the entire Company that runs the Fuellox. Project may operate across a range of Clients/Sites
Fuellox Paramaters can be configured in four ways:
CLIENTandSITEPROJECTCLIENTandSITEandPROJECT- No Paramaters at all
In some cases Parameters are not collected, and you will not be required to select anything.
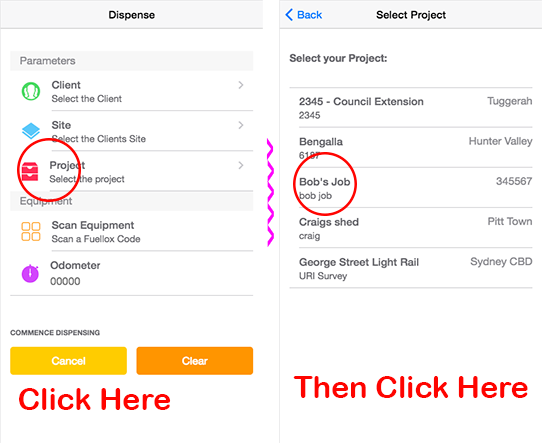
4.3 Selecting ParametersLink
Simply tap the screen for the parameter you wish to select (ie Client, Site or Project) and a list will be shown. Tap an option in that list to select it and return to the dispense menu.
The methods to select either CLIENT or SITE or PROJECT is the same.
Notes on EquipmentLink
In some cases Fuellox is configured such that the Client owns the Equipment. Rather than the Fuellox owner having their own fleet it allows each of your customers to have a fleet independant of the other equipment.
In this case, you may need to select your Client prior to revealing the Equipment List.
If you are unsure or confused, touch base with our Support Desk and we'll chat it over with you.
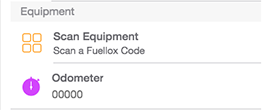
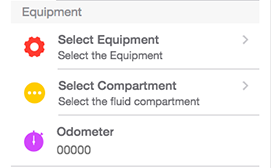
4.4 Equipment SelectionLink
Equipment is selected from one of two ways.
SELECTChoose from a listSCANScan a QR Code using the smartphone camera
4.4.1 QR ScanningLink
Allows the app to scan a QR Code to identify:
- Vehilce
- Compartment
- Fluid
- Preset Limits
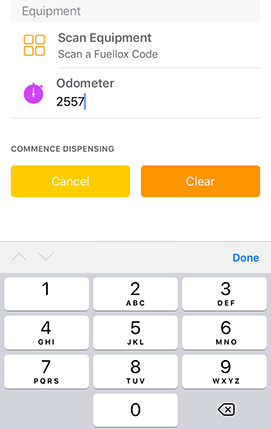
Simply tap the Screen where it shows the Scan option. The camera will open, and point your phone at a Fullox QR Code. If its the first time you use the Scan function your phone will request permission to use the camera, always accept this option.
This image shows the Dispense page, before Scanning.
This image shows the Dispense page, after Scanning.
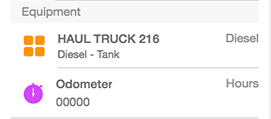
Note the Icon changes from an Outline to a Solid once the Equipment has been selected.
4.4.2 List SelectionLink
Allows the operator to select the Equipment for refulling.
Tap the Equipment section, and a list of Equipment will be shown. There may be a search bar (depending on your system) that enables you to quickly find any machine with a search string. Note the search string applies to multiple fields:
- Name
- Make
- Model
- Serial
- Equipment Type
If the Equipment only has one compartment registered, the compartment will be automatically selected for you.
Where there is more than one compartment (ie more than 1 diesel tank OR more than one fluid tank) you will need to select that compartment too.
4.5 OdometerLink
Once you have selected the equipment, you may be required to enter the ODO. The required Unit of Measure (UOM) will be shown. Click the ODO Section to enable a key pad, and simply enter the Odometer Reading.
4.6 Made a mistake?Link
If you have made an error with your selections, simpyl tap taht item again to reselect.
You can start again by taping the CLEAR button, or CANCEL to return to the main menu. See image above.
4.7 Fuellox ConnectionLink
You must be within 5-10 meters to connect and use the Fuellox system.
4.7.1 Special NotesLink
When you selected the Equipment/Compartment combination we applied a fluid filter. That means if you select a DEF Compartment Fuellox app will only search for Fuellox systems configured with a DEF Pump.
Tap the Fuellox section to connect to your pump.
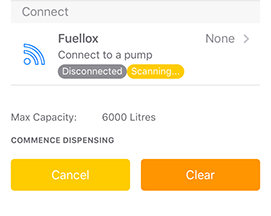
In this image it tells us the App is scanning, but not yet connected. Note the Icon is an outline as the Fuellox unit has not yet been connected.
4.7.2 Selecting your Fuellox unitLink
You should see your Fuellox enabled Pump in the list shown.
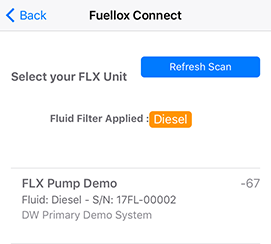
Simply tap the List Item to connect to it.
Although a rare occurence, should there be multiuple Fuellox units in range, multiple List options will be shown. Be mindful to connect to the correct Fuellox system in these cases.
4.7.3 Scanning IssuesLink
If your Fuellox unit does not show up, simply click the Refresh Scan Button to scan again. Scanning takes around 5 seconds and always clears the cache of devices.
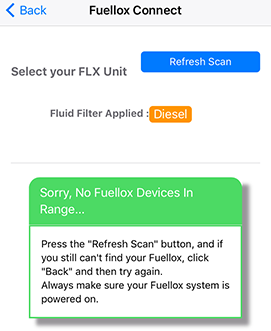
If you repeatedly experience issues with scanning or your scan results, please raise a Support Ticket.
4.8 ConnectedLink
When you Fuellox unit has been connceted to your smart phone, the system will be shown as follows.
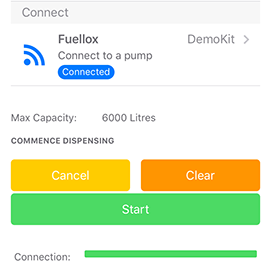
Note the Icon is now solid indicating the unit is connected. The name of the Fuellox unit is also shown.
It's not too late to cancel now. Click CANCEL to go back to the main menu. Click CLEAR to clear the form and start again.
Notes on rangeLink
Fuellox expects you to be within approx 10m to use the system. You will notice the Range Slider fluctuate as you move around. If it goes red, you could lose the connection, which will stop the pump.
Should the connection break, get back close to the Fuellox unit and the connection should automagically re-establish itself and start the pump again. If not, you will need to start the dispense transaction again.
4.9 StartLink
If you have selected all the Parameters correctly and Connected to the Fuellox unit, your Start button will be visible.
Press START to commence pumping. The app's User Interface will update to show the fluid dispensing.
4.10 DispensingLink
You must stay within 5-10 meters for the Fuellox system to operate as expected.
Note that:
- Local noise, interference and environmental conditions may interfere with the range.
- Industrial equipment such as wleders, plasma cutters, strong electric fields and starter motors may cause substantial interference
- Remain in line of sight for best signal strength
WarningLink
Transfering fuel is hazardous by nature. Please consult your Safe Work Method Statement for further details. These warnings are to be used as a guide only.
- Always remain close by to any fuel dispensing activities.
- Always use an Auto Shut off nozzle
- Use a safety approved platform for any difficult to reach fill points
- Always ensure tanks are vented prior to filling
4.11 Volume Dispensed.Link
Once the Fullox unit has started dispensing fuel, the app will show your progress.
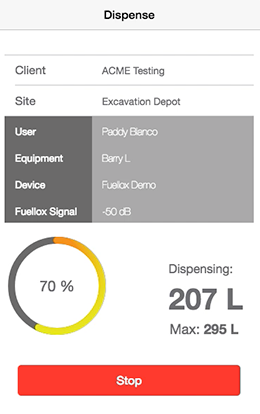
You can press STOP at any time.
If your Fuellox system is integrated with an ESTOP or PUMP SWITCH pressing these will also stop the pump.
If your Fuellox is integrated to a NOZZLE HOLSTER hanging up your nozzle will also stop the pump.
4.12 TimeoutsLink
Fuellox is integrated with TIMEOUT features.
PRE START TIMEOUT If you authorize the pump, but fail to commence flow this Timeout, Fuellox will terminate the transaction.
POST FLOW TIMEOUT If the system detects no flow for a period exceeding this Timeout, Fuellox will terminate the transaction.
PRESET If the volume dispensed equals or exceeds the preset volume limit, Fuellox will terminate the transaction.
For any tranasction that Times Out will need to be started again.
4.13 Dispense SummaryLink
After you hit stop the pump, or the transaction is terminated for any other reason the Dispense Summary screen will be shown.
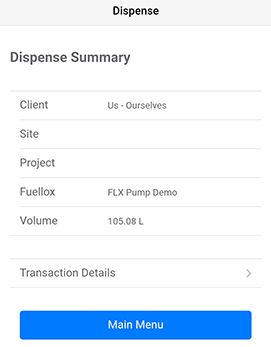
Simply Press MAIN MENU to go back.